Showing posts with label speckled egg. Show all posts

Tuesday, November 26, 2013

... on eggs. Real ones!

I've got a few eggs to show you. A while back there were some mickies nesting in the wattle tree out the front, and one day, soon after tiny whistlings started coming from the nest, I found an egg on the ground. It was almost-intact, save for a small hole in one side, and it must have been shoved out of the nest as a dud. 

Then, another bunch of mickies nesting at my Ma's place. They'd built in a hanging branch of a paperbark tree, quite low to the ground, and it contained three of their lovely brown-speckled eggs. A few days later though, my Ma reported that the nest must have been raided by a bigger bird, for the eggs were gone (as were the mickies) and the nest was hanging crookedly from the branch. Did I want the nest? Oh yes please!
Can you see the wonderful stuff they've used to pad the nest? I'd seen a few nests where the birds have sourced fluffy building insulation to use, which is generally white or grey, but these mickies have found some two-toned synthetic green material, and used that. 

There has been some interesting chicken egg action around here lately. Normally my Pekin bantam girls lay white-to-pale-brown solid-coloured eggs, but have at look at this delight that awaited me in the nestbox recently. 
A speckled egg! There has been only one, and I have my suspicions that it's the result of some antibiotics that I have been giving Ginger, trying to combat an ongoing case of bumblefoot. Isn't it special? (Ginger is much better, too!)

Lastly, a couple of oddities.
That big egg at the back is a regular Pekin bantam egg. The little white one in front is an end-of-the-season egg from my Ma's English Game hen, Major Hoolihan. The tiny brown one to the right there is a bit special because it's come all the way from Stanthorpe, through the mail, from fellow BrisStyle member, Sarah. I believe the egg came from friends of hers, and it's extra-special because it's the very first egg one of their bantams has laid. Shortly I'll make moulds of those two wee eggs, and see what happens next!

Thursday, November 14, 2013

... on countdowns and crossings off.

Well, the countdown is almost over - it's Finders Keepers this weekend. I haven't done it before, so it's  a shot in the dark, and I'm apprehensive because I have no idea what it'll be like or how it will go and whether the wind will blow my veranda stall away and will the folding table bear the weight of my display and what are 'fire resistant timbers' (I'm just ignoring that little piece of info in the stallholders manual!) and what will I do if I run out of change and... and... can you tell I'm anxious!?

But, I'm almost there. I've got lists, MULTIPLE lists, with lots of things crossed off them, and only a few more major (but achieveable) things to do before bump-in tomorrow evening. I've got stock levels that I'm comfortable with in two ways - if I sell out of a particular thing that'll be surprising and delightful, and if I sell none of a particular thing then it's not too much to have on hand. I've got a new cast plaster letter display that fits in much better with the look of my stall.
The map of stallholders has now been released, which I have popped up on my Facebook page. I'll be at stall D10 which is on the veranda near the stairs going down into the garden. Visitors who stop by can have a first look at my newest wee linen nest, containing an extra-special speckled egg.
In the spirit of getting things done, recently I crossed a big thing off my list of things to do. You know you're a bit slack in the 'do website' department when you get an annual hosting renewal notice before you've managed to get around to designing your site. Hello something-more-than-a-holding-page-at-kuberstore.com!

I've done this using Squarespace, as their level of customisation potential was able to balance my 'desire to make it look a certain way' with 'I am a web design gumby' and 'I'd like to be able to change this whenever I want'. Doing Finders Keepers was the kick I needed to get my website sorted out, and I'm glad, as quite a lot of traffic is coming from the FK stallholder profiles right now!

So. Fingers crossed for mild weather and smiling faces and non-collapsing tables! See you there if you're going, or stay tuned for a Finders Keepers wrap-up next week. Cheerio!

Friday, October 11, 2013

... on little bits of signage.

I'm just about ready to pack everything up for tomorrow's BIM at City Hall. You know, every time I'm preparing for a market I find something that I can do better. Each market I've done up until now has seen me scurrying about at the last minute sorting out something small but vital - pricepoint signage.
These folded cardboard signs have worked well in terms of angle and size, but as they've been taped together at the start of the day and then thrown out at the end, I've been having to re-create them each time. I can only fit three to an A4 page so I was going through lots of card. Plus they have a tendency to blow away. I liked the look, but as I've got at least three more markets to do before Christmas and I'm almost out of card, I wanted to sort out something less disposable. Enter C and his mad saw skills. Bless the man, again.

He rummaged about and came up with a piece of timber from a pallet, and chopped it up into lots of triangular prism shapes for me. A once-over with some sandpaper and they were just as I'd imagined. All my pricepoints fit easily onto a single printed piece of A4 card...
... and they certainly won't blow away! They tone in nicely with my old wooden display items and my little wattle forest, and my shredded paper egg display nests that are also making their first appearance at tomorrow's market.
Is anyone's market setup ever 'finished'? I feel that each little thing I improve upon contributes to a better display, but I don't know whether it's ever going to become a static or finished thing... and that's good!

Saturday, September 7, 2013

... on taking an idea and running with it.

Last week I shared some in-progress shots of the speckled egg cards I've been making for the upcoming BrisStyle Indie Market, which is next Saturday. They're now all packed up with their stripy brown-paper envelopes in A6 plastic sleeves, and C has made me a nice little plywood box to display them in on the day. Many thanks, C!
These will be available for $4 each on the day. Hurrah!
Then, I wanted to try a more random assortment of eggs... different sizes and varying shapes, and arrange them like the photo of the real eggs displayed in the Launceston Museum that my friends had sent me. 
I set about taking this idea and turning it into a repeating pattern. I photographed my paper eggs, jumped into Photoshop, and three days later I had just about figured it out! I'd never made a proper repeating pattern in Photoshop before, so I learned a few things along the way. One thing I wish I'd figured out sooner... start with the corners. I wanted this pattern to work as a tile - that is, for the original piece to be able to be repeated infinitely without any discernable join on any edge, not even by one pixel. So, once you have got one corner sorted out, you essentially have all four. Wish I'd figured that out sooner.
Anyway, here's the resulting pattern. This is a piece slightly larger than one tile.
One thing I'm glad I realised early on is that it's helpful to work at the highest resolution you can, although I did eventually figure out that there's a 2GB limit on Photoshop file sizes on my computer. This amazed me - and then didn't, when I remembered that the first computer our family owned had a hard drive with a total capacity of 2GB, and that it cost almost $20,000. Phew!
So, I worked big - this is about actual size:
After I'd triple-checked that everything was in order in terms of the repeat, I could then start to play. Oh did I play. I'd forgotten how lovely working in Photoshop can be, and in fact it's very easy to go crazy with variations and become a little overwhelmed. Once I'd got myself back under control, these were the results:
I'm feeling like it's Christmas morning! There's so many possibilities. I feel like uploading them all to Spoonflower, digital printers of fabric and wallpaper, and ordering lengths of silk and upholstery linen, and wallpapering my whole house.
I'd love to know your favourite version... do let me know!

Sunday, September 1, 2013

... on variations on a theme.

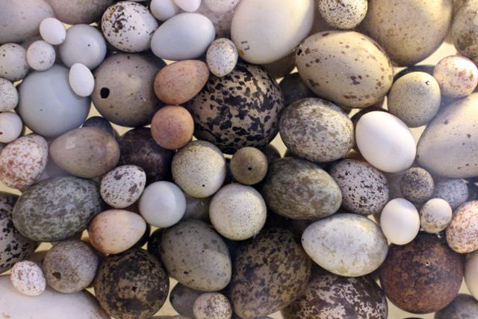
Friends sent me a couple of photos they took on their recent trip to Tasmania. They saw these in the Launceston Museum and thought of me, egg-fancier that I am.

Isn't that just the most delicious collection of eggs? Such a beautiful way to display them, too. I saw them, thought of my stack of nice old coloured pastel paper (found for me last year by my excellent-op-shop-rummager-friend Beck) and my mind started racing. 
The result was a little stack of speckled bird egg cards. Each one is a little bit different, given the random nature of the speckle, and I've really enjoyed the simplicity of this cut-and-paste project.
I'm using thick watercolour paper as the base card, and I've found a supplier of some lovely stripy-brown-paper envelopes to go with them. I'll make another handful, pop them into some C6 plastic sleeves and try them out at the next BrisStyle Indie Market in City Hall on the 14th September. 
It's always refreshing to try variations on a theme - just call me Egg Girl!

Sunday, July 28, 2013

... on two new things.

I've been saving up the cast eggs from this one mould I made a while back, in honour of an odd little egg that one of my Ma's chooks laid. Her name is Major Hoolihan, and she got her name because she's very neat and somewhat busty-looking, like her namesake from M*A*S*H.
That's her odd little egg, alongside a regular-sized bantam hen egg. Normally she lays eggs of a decent size, so I don't know what she was thinking that day. 

Anyway, every time I've poured a batch of plaster lately I've been pouring into that one tiny mould, too, and so now I've got over 20 casts of this egg. I mixed up a batch of pale blue acrylic and painted the lot of them at once. Speckles, too. I had another chevron wall hanging in mind.
After the cacophony of colour that has been characterising these wall hangings of late, I'm pleased with the muted peacefulness of this one. With all the possibilities suggested by eggs (whether symbolic (rebirth, hopes for the future, etc) or practical (omelet, chocolate mousse, etc!), I think this would look lovely in a child's room.

Followers of Kuberstore on Facebook will have already seen these in-progress photos of a little nest I've been working on. I'm currently preparing for the next BrisStyle Indie Market in City Hall, and I was fraying the edges of a piece of linen to use as a tablecloth. Afterwards I was left with a huge handful of these wonderful stormy grey linen threads. I took a needle, threaded it up with a piece, and started working it through the handful, shaping as I went.
I was initially planning to use a single large white plaster egg with this nest, but thought I might try out a special speckled one instead. I used a few layers of watercolour paint as the base colour (which allows the nice texture of the plaster to come through, especially if I rub it back with paper towel while it's still wet) and then speckled it with white, followed by layers of satin varnish. I had to be very patient (and I'm the least patient person I know) because this is the first painted egg I've done that hasn't had a hanging loop in one end. I had to do it side-by-side and let it dry inbetween-times. Patience, Em!

So, it's finished, and is now available in my Etsy shop. This is something a bit new for me, and I'm quite liking the look, and the process. I might have to source some more linen and see what comes next!