Sunday, July 28, 2013

... on two new things.

I've been saving up the cast eggs from this one mould I made a while back, in honour of an odd little egg that one of my Ma's chooks laid. Her name is Major Hoolihan, and she got her name because she's very neat and somewhat busty-looking, like her namesake from M*A*S*H.
That's her odd little egg, alongside a regular-sized bantam hen egg. Normally she lays eggs of a decent size, so I don't know what she was thinking that day. 

Anyway, every time I've poured a batch of plaster lately I've been pouring into that one tiny mould, too, and so now I've got over 20 casts of this egg. I mixed up a batch of pale blue acrylic and painted the lot of them at once. Speckles, too. I had another chevron wall hanging in mind.
After the cacophony of colour that has been characterising these wall hangings of late, I'm pleased with the muted peacefulness of this one. With all the possibilities suggested by eggs (whether symbolic (rebirth, hopes for the future, etc) or practical (omelet, chocolate mousse, etc!), I think this would look lovely in a child's room.

Followers of Kuberstore on Facebook will have already seen these in-progress photos of a little nest I've been working on. I'm currently preparing for the next BrisStyle Indie Market in City Hall, and I was fraying the edges of a piece of linen to use as a tablecloth. Afterwards I was left with a huge handful of these wonderful stormy grey linen threads. I took a needle, threaded it up with a piece, and started working it through the handful, shaping as I went.
I was initially planning to use a single large white plaster egg with this nest, but thought I might try out a special speckled one instead. I used a few layers of watercolour paint as the base colour (which allows the nice texture of the plaster to come through, especially if I rub it back with paper towel while it's still wet) and then speckled it with white, followed by layers of satin varnish. I had to be very patient (and I'm the least patient person I know) because this is the first painted egg I've done that hasn't had a hanging loop in one end. I had to do it side-by-side and let it dry inbetween-times. Patience, Em!

So, it's finished, and is now available in my Etsy shop. This is something a bit new for me, and I'm quite liking the look, and the process. I might have to source some more linen and see what comes next!

Thursday, July 18, 2013

... on now.

A lovely morning... the studio is warm, a 'This American Life' podcast is on, my hands are dusty with plaster, the sun was out but now a misty winter shower has come across, the latest pour of eggs are curing and I've got lots to do. Lots! I'm going to be doing my first BrisStyle Indie Market in the beautifully restored rooms of Brisbane City Hall on Saturday 10th August. I've got a whole table to fill, display ideas overflowing, a stall helper arranged (thanks Ma!) and just over three weeks to prepare.
I'm about to package up this set of five speckled eggs and send them off to a secret destination that I hope to be able to reveal more about soon. Exciting!
I had a visitor with a camera yesterday (more on that soon, too), so the scurf that usually lingers about in the studio has been momentarily tidied away. It prompted me to find a proper home for the huge pile of newspapers that had previously been living in the hallway, and helped me accept that although I may have hoarding tendencies, I'm not too bad. Not yet!
A cup of tea and my morning will be perfect! How's yours?

Friday, July 12, 2013

... on making dirt.

You might remember my first foray into the world of no-dig vegie gardening. I followed a recipe by Stephanie Alexander, and used bales of straw and lucerne as the garden 'edges'. I can now report on the success of that experiment, and I have to say - I wouldn't do it that way again. Perhaps last summer was a particularly wet one here in Brisbane, but those bales rotted down so fast that very quickly, TOO quickly, they had decomposed and my lovely piles of compost and manure (that the bales were supposed to be containing) were oozing gracefully out into the surrounding ground, taking my lush vegies along for the ride. Additionally, it became hazardous to try and pick things from the garden, as I had to step onto the rotting bales to reach anything, and of course stepping on them squashed them even further. Perilous!

Here's what a bale looked like once decomposed. I think this one was lucerne.
You can see the blue baling twine mixed in with the rotted bits of lucerne (and some opportunistic tomato seedlings) as well as the even-more-well-rotted remains of the bale. Lots of fabulous compost, yes. Garden edge? Not any more.

Over summer, the vegie garden as a whole got a bit buggy, and then overrun with pumpkin. Anything leafy (like the spinach, purple sprouting broccoli and kale) got infested with cabbage moths and aphids, and the whole thing was in a rather sorry state. I let the pumpkin do its thing and then a month ago the whole vine suddenly went yellow and died, prompting me to harvest about eight good-sized pumpkins, and a stack of smaller ones that had stopped developing but proved to still be edible.

With the absence of pumpkin the garden revealed itself - or should I say, the lack of garden revealed itself. All I had left of the first garden (I had made two, the first before last winter, and another before last summer) was a very large pile of ex-garden that began to slide alarmingly down the yard with every bit of rain. (Curiously, one such slide did reveal a secret crop of sweet potatoes who had been lurking beneath the pumpkins.) But action was required, and as usual, C came up with the necessary arm strength.
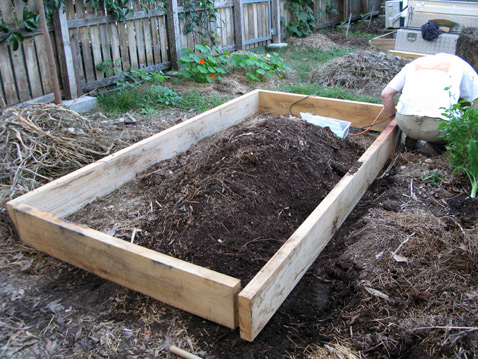
Here it is - a simple wooden edge using untreated timber. Getting untreated timber is important (it was ordered in by the timber merchant as they didn't have it in stock) as I don't want any of the chemicals used to preserve timber to leach into the soil and therefore into our vegies.

I should add here that the reason that I didn't dig that compost straight into the ground is that we live in an area where the natural soil is not soil at all - it's solid clay, and so any garden needs to to be built up on top of it for best chance of success.

Anyway, C made me two lovely timber-edged beds, which take up about the same area as one of the original straw-bale-edged beds. I admired his handiwork for a while and then took a look at what remained from the original bed. After pulling out all the blue baling twine, I mixed up the decomposed bales with the original 'lasagne' from the no-dig bed - the layers of lucerne, compost, manure, straw and Hydrocell. Here's what's left:

A lovely mulchy mix, full of little munching insecty bugs (and some of those appalling Gigantor lawn grubs that even the chooks have difficulty touching, let alone eating) and well-rotted straw, and even some of the original Hydrocell (above, that's the big white clump) water-retaining stuff. 
So, this year I'm going with a tweaked version of Stephanie's no-dig lasagne recipe from last year. I put a thick layer of cardboard down on the ground first, (under the edges of the timber, to stop grass coming through) followed by a layer of lucerne in chunks about ten centimetres thick. Over the top of that I spread the remainders from last year - that's the big pile you can see in the photo above. That just about filled the timber to the top - but it will all settle quite a lot, so I kept piling stuff on.
Four bags of sheep manure, followed by two big bags of Searle's Compost Mix. I love the Searle's Compost Mix - it's got fish and seaweed and worm castings already added to the compost, making it a very rich mix. I grew last year's potatoes in it, neat, and they were grand!

I then forked the whole lot over gently, taking care not to disturb to the lucerne layer. A bit of water to help it settle and I think this will be ready to start planting. I'm keen to get some greens in  - and very interested to see how this works compared to last year. I hope to have good things to report in a few weeks - fingers crossed, hey?